
How to Fix Blurry Projector Screen [9 Tested Methods]
-
 Written by:
Kristy Roger
Written by:
Kristy Roger
- Last Updated:
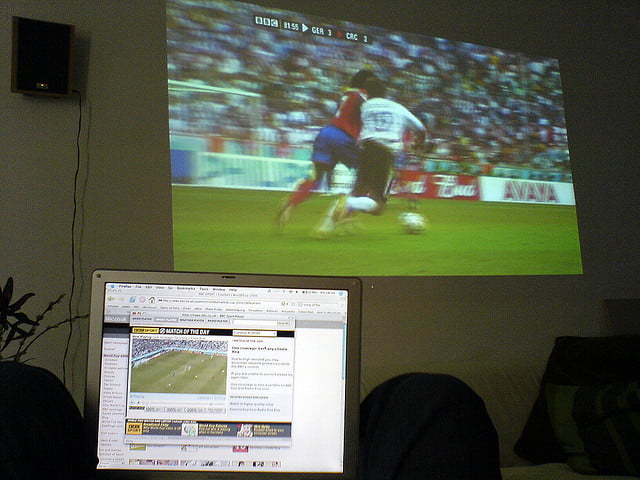
So, you’ve set up your projector for a movie night or an important presentation, and bam—the screen looks like a blurry mess.
Trust me, I’ve been there, and it’s beyond frustrating. But don’t worry, you’re not stuck with that fuzzy picture. I’ve put together a guide that walks you through following 9 tried-and-true methods to get that projector screen looking sharp and clear:
- Adjust the Focus
- Check the Lens
- Reposition the Projector or Adjust Keystone Correction
- Update Software
- Examine the screen or projecting surface
- Check the Source
- Calibrate the Projector
- Test Different Inputs
- Consult the Manual
Whether you’re a tech newbie or a seasoned pro, these steps will help you troubleshoot the issue and enjoy a crisp, clear image. Let’s dive in and get that screen back in focus!
Table of Contents
9 Methods to Fix Blurry Projector Screen from Top, Bottom or Around Edges.
Method 1: Adjust the Focus
So, the first thing I tackle when my projector screen looks a bit blurry is the focus knob. You’ll usually find this dial somewhere on the projector itself.
I give it a gentle twist, either to the left or right. Most of the time, this quick move makes the picture clear again. It’s a simple step, but you’d be surprised how often it does the trick.
So, before you panic about a blurry screen, try giving that focus knob a little turn. You might just solve the problem in seconds!
Method 2: Check the Lens
Another quick fix I try when my projector’s acting up is checking the lens. Believe it or not, a smudged lens can make your picture look like a mess.
So, I grab a lens cloth or some lens cleaner. Gently, I wipe away any dirt or fingerprints. After that, the picture usually looks a whole lot better. It’s a simple step, but cleaning the lens can make a world of difference. So, if your screen’s still blurry, give that lens a good clean!
Oh, and let’s talk about how often you should clean that lens. In my experience, a good rule of thumb is to give it a gentle wipe every two weeks.
If you use your projector a lot, like for daily movie nights or constant presentations, you might want to clean it weekly. Trust me, keeping that lens clean regularly can save you from a lot of blurry moments down the line.
So, make it a habit; your projector will thank you!
Method 3: Reposition the Projector or Adjust Keystone Correction
Another thing I look at when my projector screen isn’t clear is its position. If it’s tilted or not sitting flat, the image can get blurry. So, what do I do?
I make sure the projector is level and facing the screen straight on. Some projectors even come with levelling feet or special features such as Keystone Corrections to help you get it just right. I use those if they’re available. Trust me, a little adjustment can go a long way in making your picture crystal clear.
Using keystone correction is pretty straightforward, but it can make a huge difference in how your projected image looks. First, I find the keystone adjustment in the projector’s menu. It’s usually under settings or something similar.
Once there, I see options to adjust the image either vertically or horizontally. I use the remote or the buttons on the projector to tweak these settings. As I make adjustments, I keep an eye on the screen to see how the image changes.
The goal is to get a perfectly rectangular picture that’s not slanted or distorted. When I’m happy with how it looks, I save the settings. And that’s it! The image now fits the screen better and looks way more professional.
So, if you’re still struggling with a blurry image, check the position of your projector. It might just need a little tweak!
Method 4: Update Software
Hey, guess what? Sometimes the problem isn’t even with the hardware; it’s the software that needs a little love. I head over to the manufacturer’s website to see if there are any new updates.
If I find one, I download and install it right away. You’d be surprised how often a simple software update can fix a blurry screen. So, don’t forget to keep your projector’s software up-to-date.
It’s an easy way to avoid a lot of headaches later on!
Method 5: Examine the Screen or Projecting Surface
Hey, you won’t believe this, but sometimes the screen itself is the troublemaker. I give it a good look to make sure it’s clean and smooth.
If I spot any wrinkles or smudges, I take care of them right away. A clean screen can make a world of difference in picture quality. So, don’t overlook this simple step; it could be the key to a crystal-clear viewing experience!
If you projecting on a wall, I check the surface I’m projecting on. It needs to be as smooth, clean, and plain as possible. Sometimes, even a small bump or dirt on the wall can mess up the image quality.
So, I give the surface a good wipe down or even iron the projector screen if it’s wrinkled. Trust me, a clean, smooth surface can make a world of difference for a clear, sharp projection.
Method 6: Check the Source
Guess what? Sometimes it’s not even the projector’s fault! I’ve learned to double-check the video or material I’m trying to project. If it’s not high resolution, it won’t look great on a big screen.
So, before I jump to conclusions, I ensure the source material is top-notch. It’s a simple step, but it’s saved me from a lot of unnecessary troubleshooting!
Method 7: Calibrate the Projector
Calibrating the projector can be a game-changer. I grab the manual and look up how to adjust the advanced settings. Following those steps, I tweak the image until it’s just right. Trust me, taking a few minutes to calibrate can make your movie night or presentation look way better!
Here’s a simple guide to help you get started:
Read the Manual: First, I always check the user manual for any specific calibration instructions. Manufacturers often provide helpful tips.
Place the Projector: I make sure the projector is at the right distance from the screen. The manual usually has guidelines on this.
Focus the Lens: Using the focus knob, I adjust until the image on the screen is as sharp as possible.
Check the Aspect Ratio: I set the aspect ratio so it matches the source I’m using. For most movies and TV shows, 16:9 is the standard.
Adjust Brightness and Contrast: I go into the projector’s settings menu to tweak the brightness and contrast. I aim for an image that’s clear but not washed out.
Color Calibration: If the projector has color settings, I adjust them next. Some projectors have preset modes like “Cinema” or “Sports” that make this easier.
Sharpness: I adjust the sharpness setting if it’s available. Too much can make the image look artificial, so I’m careful here.
Test the Image: I use a calibration disc or a streaming service’s calibration video to fine-tune the image. These tools display patterns that help you set the correct brightness, contrast, and color.
Save Settings: Once I’m happy with how everything looks, I save the settings. Some projectors let you save multiple profiles, which is handy if you use the projector for different types of content.
Recheck Periodically: Over time, the projector’s lamp will age and settings may drift, so I make it a point to re-calibrate every few months.
And there you have it! With a bit of time and patience, you can calibrate your projector for the best possible picture.
Method 8: Test Different Inputs
First, I grab all the cables for different inputs: HDMI, VGA, and USB. Then, I plug each one into the projector, one at a time. This helps me figure out if a particular port is causing the blurry picture.
For example, if the HDMI looks fine but the VGA is blurry, I know where the problem lies. After testing, if I find a faulty port, I avoid using it and stick to the ones that display a clear image.
This simple test saves me a lot of guesswork and helps pinpoint the issue quickly.
Method 9: Consult the Manual
When nothing seems to work, I grab the user manual or hop online to check out forums. There, I look for tips from people who have the same projector model as mine.
Often, someone else has faced the same issue and figured out how to fix it. Reading their advice often gives me the solution I need to clear up the blurry screen.
Trust me, the manual and online communities can be lifesavers when you’re stuck!
How to Make a Cheap Projector Better?
If you’re working with a budget projector, there are still ways to get a better viewing experience. First, I’d focus on the room. Darkening the space as much as possible can make a huge difference in picture quality. Even a cheap projector looks better in a dark room.
Next, I’d look at the screen. While a dedicated projector screen is ideal, a smooth, white wall can also do the trick. If you’re using a wall, make sure it’s clean and as smooth as possible for the best image quality.
Sound is another area for improvement. Most projectors, especially budget ones, have weak built-in speakers. I’d invest in a decent set of external speakers or a soundbar. Even a small investment here can dramatically improve your viewing experience.
Calibration is key. I’d spend some time adjusting the projector settings like brightness, contrast, and color. Some projectors have preset modes tailored for different viewing scenarios like movies, presentations, or sports. I’d experiment to find what looks best to me.
If the projector doesn’t have keystone correction for adjusting the image shape, I’d make sure to place it level and at the right height to minimize distortion. Some books or a quick DIY stand can often solve this problem.
Lastly, I’d make sure I’m using the best possible source material. A low-quality video file will look even worse when projected, so I’d always try to use the highest quality source available.
By taking these steps, I can convert even a budget projector into High Resolution provide a pretty satisfying viewing experience.
Are there Budget-Friendly Options for High-Resolution Projectors?
I’ve often wondered if there are any wallet-friendly choices for projectors with high resolutions. So, I did a bit of digging, and the answer is yes! There are definitely budget-friendly options out there that offer impressive high resolutions.
I looked into different brands and models, and I came across the WiMiUS P62 and HAPPRUN 1080p projector, which are quite budget-friendly, ranging from around $135 to $150.
What caught my attention is that HARPRUN even includes a 100-inch screen – talk about value! This projector delivers good resolution without breaking the bank.
They also support various connection options like smartphones, HDMI, USB, AV, Fire Stick, and even PS5. This makes it a versatile choice for different entertainment needs.
It’s reassuring to know that I don’t necessarily have to spend a fortune to experience high-resolution visuals. The HAPPRUN and WiMiUS P62 projector seems like a solid option for those looking for quality without a hefty price tag.
So, if you’re on the hunt for budget-friendly high-resolution projectors, this one could definitely be worth considering.
How do I Make my Projector Brighter and Clearer?
To make my projector brighter and clearer, I start by checking the room lighting. Dimming the lights or closing the curtains can make a big difference. A darker room helps the image pop more, even on a not-so-great projector.
Next, I fiddle with the projector settings. Most projectors have options for brightness, contrast, and sharpness. I adjust these until the picture looks as clear and bright as possible. Sometimes, switching to a different preset mode like “Cinema” or “Vivid” can also help.
Cleaning the lens is another quick win. A dirty lens can make the image look dull or blurry. I use a soft lens cloth to gently wipe away any dust or smudges.
If the projector is still not bright enough, I consider its placement. Bringing the projector closer to the screen can make the image brighter, although it will also be smaller. I find the sweet spot where the size and brightness are both to my liking.
Sometimes, the issue is with the source material. I make sure to use high-quality video files or streams to get the best possible image. A blurry YouTube video will look even worse when it’s blown up on a big screen.
Lastly, if I’m still not happy with the brightness, I think about investing in a better screen. Some projector screens are designed to reflect more light, making the image appear brighter. While this is an added cost, it can make a significant difference in the viewing experience.
By taking these steps, I can usually make my projector’s image both brighter and clearer, without having to buy a new projector.
Why does my Projector Lose Color?
When my projector starts losing color, it’s a real bummer. The first thing I do is check the cables. A loose or damaged cable can mess up the color signal. I make sure everything is plugged in tight and consider replacing any old or worn-out cables.
Next, I look at the source device. Sometimes the issue isn’t with the projector but with what’s sending the video. I try a different device or play a different video to see if the color issue persists.
Projector settings are another possible culprit. I dive into the menu to make sure no strange color settings got turned on by accident. Some projectors have different modes like “Cinema” or “Game” that adjust the color balance. I cycle through these to see if one brings the color back to normal.
Dust can also be a problem. When too much dust collects inside the projector, it can affect the light path and mess up the colors. I consult the manual for safe cleaning instructions, or if it looks too complicated, I might take it to a professional.
If I’ve tried all these steps and the color still isn’t right, it might be time to consider more serious issues. The projector’s lamp could be nearing the end of its life, or there might be a problem with the internal electronics. In that case, I check if the projector is still under warranty and consider getting it repaired or replaced.
By methodically checking these factors, I can usually figure out why my projector is losing color and take steps to fix it.
Final Thoughts
Alright, we’ve covered a lot of ground, haven’t we? From fiddling with focus knobs to checking source quality, these nine methods should help you tackle that pesky blurriness.
Remember, a clear projector screen can make or break your viewing experience, whether it’s for work or play. So the next time your projector decides to go all fuzzy on you, don’t panic.
Just revisit these tips, roll up your sleeves, and get to work. You’ll be back to crisp, clear visuals in no time. Happy projecting!
Author of this Post:

Kristy Roger
Home Cinema Consultant & Tech Enthusiast
Holding a background in Industrial and Electrical Technology from the University of Alberta, Kristy has spent 5+ years consulting on home theater products at a top electronics firm. As a certified Technical Professional with Lean Six Sigma credentials, Kristy expertise ranges from projector nuances to hands-on experience with leading models. Kristy have been sharing her knowledge online for two years, blending professional insights with personal experiences from her own home cinema setup. Off the screen, She is a dedicated mom to Jerry, Ryan, and our two pups, Cuddle and Paw.


