
How to Clean Projector Screen? [6 Easy Step-by-Step Guide]
-
 Written by:
Kristy Roger
Written by:
Kristy Roger
- Last Updated:
Over time, dust, dirt, smudges, and even stubborn stains can accumulate, affecting your screen’s performance.
Cleaning your projector screen is essential to maintain image quality and the overall longevity of your equipment.
In this comprehensive guide, I’ll walk you through the steps and best practices for cleaning your projector screen effectively and safely.
Whether you have a fabric, vinyl, or glass screen, we’ll cover the techniques to ensure your screen stays in optimal condition.
So, let’s roll up our sleeves and discover how to keep your projector screen as clean as the day you first set it up.
I recommend using the Table of Contents to quickly access the information you need.
My article is designed to cater to home cinema users of all levels, from Beginners to Advanced enthusiasts.
Table of Contents
Quick Overview: Screen Material and Recommended Cleaning Method
Here’s a table listing various screen types or materials and their corresponding recommended cleaning methods:
Screen Type/Material | Recommended Cleaning Method |
Fabric | Vacuum or gentle dry cleaning with a soft brush. For stains, use a mild soapy solution and a damp cloth. Avoid excessive moisture. |
Vinyl | Dusting with a soft brush or a can of compressed air, followed by cleaning with a damp, soapy cloth. Rinse and dry thoroughly. |
Glass | Wipe with a damp, soapy cloth, followed by a clean, damp cloth to remove soap residue. Dry with a microfiber cloth for a streak-free finish. |
Acoustic Transparent | Gently vacuum with a soft brush attachment or use a can of compressed air for dust removal. For stains, use a mild soapy solution and a damp cloth. Avoid excess moisture. |
Retractable/Electric | Dust off loose debris and then clean based on the screen material. Be cautious around electrical components; follow manufacturer guidelines. |
Inflatable | Use a soft brush to remove dust and dirt. Clean with a mild soapy solution and a damp cloth. Rinse and dry thoroughly. |
Please note that these are general cleaning recommendations, and it’s essential to follow manufacturer guidelines for your specific projector screen model.
Different screens may have unique care instructions, and using the wrong cleaning method can damage or ripped the screen.
Always test a small, inconspicuous area before cleaning the entire
How to Clean Projector Screen?
Cleaning a projector screen is a simple task that can make a big difference in your viewing experience. Here’s how I do it:
Step 1: Gather Your Supplies
I start by gathering the necessary cleaning supplies. You’ll need a few things: a microfiber cloth, a can of compressed air, a soft brush, and optionally, a screen-cleaning solution.
For the screen-cleaning solution, I recommend the “Screen Mom Screen Cleaner Kit.” It’s safe for various screens and comes with a microfiber cloth. This kit efficiently removes smudges and doesn’t leave streaks. You can easily find it online.
Step 2: Turn Off the Projector
Before you begin cleaning, make sure your projector is turned off and has had some time to cool down. Safety first!
Step 3: Dust Off
To prevent scratches during cleaning, I use a soft brush or a can of compressed air to gently remove dust and loose debris from the screen’s surface. Start at the top and work your way down in a vertical motion. This will help dislodge any particles that may have settled.
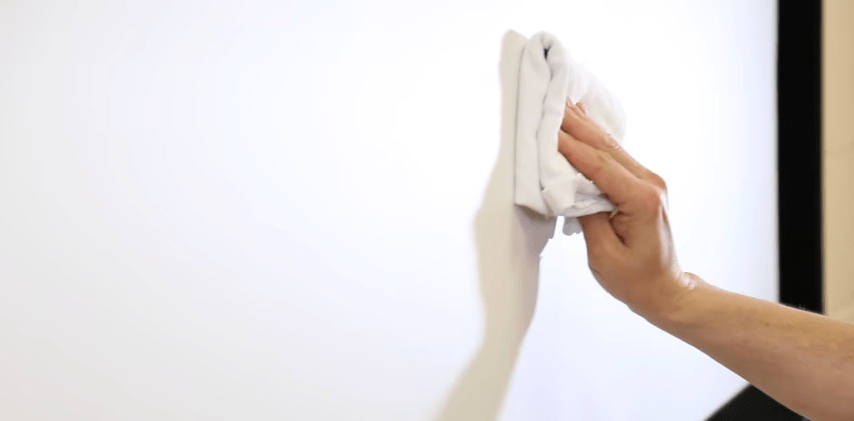
Step 4: Wipe with Microfiber Cloth
Next, I fold the microfiber cloth into a soft pad and gently wipe the screen in circular motions. Be sure not to press too hard; a gentle touch is all that’s needed to remove smudges and fingerprints.
Step 5: Tackle Stains
For stubborn stains or fingerprints, I lightly dampen a corner of the microfiber cloth with the screen-cleaning solution. You can also mix water and isopropyl alcohol (in equal parts) as a DIY alternative. Gently wipe the stained area using a circular motion.
Step 6: Dry Completely
After cleaning, it’s crucial to ensure that the screen is completely dry before turning the projector back on. Wet spots can distort the image.
With these steps and the recommended cleaning kit, your projector screen will stay clean and your viewing experience will be crystal clear. Happy viewing!
How to Wash Cloth Projector Screen?
Washing a projector screen requires a bit more care and attention than regular cleaning. You can use similar method for Rear Projection screen as well. Here’s how I do it:
Step 1: Gather Your Supplies
Before I start, I make sure to gather all the necessary supplies. For washing a projector screen, you’ll need a large tub or basin, lukewarm water, a mild detergent (like dish soap), a soft microfiber cloth or sponge, and two clean, dry microfiber cloths.
Step 2: Prepare the Cleaning Solution
I fill the tub or basin with lukewarm water and add a small amount of mild detergent. I stir the water gently to create a soapy solution. It’s essential to use a gentle detergent to avoid damaging the screen material.
Step 3: Remove the Screen (If Possible)
If your projector screen is removable, carefully take it down from its mount. Make sure the projector is turned off and cool before doing this. If it’s not detachable, you can clean it in place, but be extra cautious not to let too much water seep into the projector or electrical components.
Step 4: Gently Wash the Screen
I dip the soft microfiber cloth or sponge into the soapy water and wring it out so that it’s damp but not dripping. Then, starting at the top of the screen, I gently wipe it in a vertical motion. I avoid pressing too hard to prevent stretching or damaging the screen material.
Step 5: Rinse and Repeat
After cleaning a section of the screen, I rinse the cloth or sponge thoroughly to remove any soap residue. Then, I go over the same section again with the damp cloth to ensure all the soap is removed. This double-rinse method is crucial to prevent streaks and residue.
Step 6: Dry the Screen
Once I’ve cleaned the entire screen and ensured all soap is rinsed off, I use one of the dry microfiber cloths to gently pat the screen dry. I avoid rubbing, as this can cause streaks.
Step 7: Reassemble or Remount
If you removed the screen, make sure it’s completely dry before reassembling or remounting it. Ensure there’s no residual moisture that can damage the screen or affect image quality.
Recommended Products: For this task, you won’t need any specialized cleaning products beyond a gentle detergent. However, for the microfiber cloths, you can use any high-quality, lint-free options available at most electronics or cleaning supply stores.
Cleaning your projector screen this way ensures it remains in excellent condition, providing you with a consistently clear and vibrant viewing experience.
How do you get Permanent Marker off a Projector Screen?
Getting permanent marker off a projector screen can be tricky, but it’s not impossible. Here’s my approach:
Step 1: Act Quickly
The key is to address the permanent marker stain as soon as possible. The longer it sits, the harder it becomes to remove.
Step 2: Test an Inconspicuous Area
Before attempting any cleaning method on the stained area, I always test it on an inconspicuous spot of the screen to ensure it won’t cause damage or discoloration.
Step 3: Use Rubbing Alcohol
Rubbing alcohol is my go-to solution for removing permanent marker stains. I soak a clean, white cloth or cotton ball with rubbing alcohol and gently blot the stained area. I avoid rubbing or scrubbing, as this can spread the ink.
Step 4: Blot, Don’t Rub
I use a gentle, blotting motion, frequently moving to a clean part of the cloth or using a fresh cotton ball as the marker ink transfers onto it. This process may take some time, so patience is key.
Step 5: Wipe with a Clean, Damp Cloth
After most of the marker ink is removed, I dampen a clean cloth with water and gently wipe the area to remove any residual rubbing alcohol.
Step 6: Dry and Repeat if Necessary
I ensure the screen is completely dry before testing it with an image projection. If the marker stain persists, I repeat the process until it’s gone.
Recommended Products: For this task, you’ll need rubbing alcohol (isopropyl alcohol) and a supply of clean, white cloths or cotton balls. It’s crucial to use a non-abrasive, lint-free cloth to prevent screen damage.
Remember, the effectiveness of this method may vary depending on the type of projector screen material. Always be gentle to avoid damaging the screen, and if in doubt, consult the screen’s manufacturer for specific cleaning recommendations.
How do I Keep my Outdoor Projector Screen Clean?
Keeping an outdoor projector screen clean is crucial for a great viewing experience. Here’s how I do it:
Step 1: Regular Dusting
I start by giving the screen a good dusting with a clean, dry microfiber cloth. This helps remove loose dirt, pollen, and other debris that can accumulate on the surface. Regular dusting is essential, especially if the screen is exposed to the elements.
Step 2: Gentle Cleaning
If the screen needs more than dusting, I mix a solution of mild dish soap and water. Then, using a soft-bristle brush or a sponge, I gently scrub the screen. It’s crucial to be gentle to avoid damaging the screen material.
Step 3: Rinse Thoroughly
After scrubbing, I rinse the screen thoroughly with a hose or a bucket of clean water. Ensuring all soap residue is removed is essential to prevent streaks or damage to the screen material.
Step 4: Allow to Air Dry
I let the screen air dry completely before rolling it up or storing it. Avoiding any moisture buildup is crucial to prevent mold or mildew growth.
Recommended Products: For cleaning, I use mild dish soap, water, a soft-bristle brush, and a hose for rinsing. A clean, dry microfiber cloth is handy for regular dusting. Additionally, consider using a screen storage bag or Waterproof cover to protect the screen when not in use.
Regular maintenance and cleaning can extend the life of your outdoor projector screen and ensure a clear, vibrant image during your outdoor movie nights.
How to Clean Mold on Projector Screen?
Dealing with mold on a projector screen is essential for maintaining a clean and healthy viewing experience. Here’s how I handle it, along with some product recommendations:
- Safety First: Before you begin, ensure your safety by wearing gloves and a mask. Mold can release harmful spores when disturbed. Disposable gloves and a mask, like the 3M Half Facepiece Reusable Respirator, are essential when dealing with mold.
- Isolate the Screen: Remove the projector screen from its mounting, if possible. This will allow you to clean it more thoroughly and prevent the spread of mold spores.
- Dry Cleaning: Start by using a soft-bristle brush or a microfiber cloth to gently remove loose mold from the screen’s surface. Be cautious not to scrub too hard, as this can damage the screen.
- Create a Cleaning Solution: Mix a cleaning solution using warm water and a mild detergent. Avoid using harsh chemicals that could damage the screen material.A mild detergent like Dawn Ultra Dishwashing Liquid mixed with warm water is effective for cleaning without being harsh on the screen.
- Test in an Inconspicuous Area: Before applying the cleaning solution to the entire screen, test it in a small, inconspicuous area to ensure it doesn’t cause any discoloration or damage.
- Apply the Solution: Dampen a clean, soft cloth with the cleaning solution. Gently blot (do not rub) the affected areas with mold stains. Allow the solution to sit for a few minutes to break down the mold.
- Scrub Lightly: After letting the solution sit, use a soft brush to scrub the stained areas gently. Continue blotting and scrubbing until the mold stains are gone. Be patient, as this may take some time.
- Rinse Thoroughly: Using a clean cloth dampened with plain water, rinse the entire screen to remove any remaining cleaning solution.
- Drying: Allow the screen to air dry completely in a well-ventilated area. Ensure it’s entirely dry before remounting it or storing it to prevent future mold growth.
- Preventive Measures: To prevent mold from returning, store the screen in a dry, well-ventilated space when not in use. Consider using a dehumidifier in the room where the screen is installed to control humidity levels.
How to Keep Bugs Off Projector Screen?
Keeping bugs off your projector screen, especially for outdoor setups, is essential for a clear viewing experience. Here are some tips and recommended products:
Use an Outdoor Screen Enclosure: Invest in an outdoor screen enclosure or a screen house. These structures provide a physical barrier, keeping bugs away from your screen and projector. Look for options like the “Quick Set 12875 Escape Shelter” or similar products.
Screen Tents or Pop-Up Canopies: Screen tents or pop-up canopies with mesh walls can create a bug-free viewing area. They come in various sizes and are portable. Consider options like the “Coleman Screened Canopy Tent” or similar models.
Bug Repellent Lighting: Use bug-repellent lighting around the screen area. LED bug zapper lights like the “Flowtron BK-40D Electronic Insect Killer” can help keep bugs away.
Citronella Candles or Torches: Citronella candles or torches can create a bug-repelling barrier. Place them strategically around your viewing area.
Mosquito Nets or Curtains: Install mosquito nets or curtains around your viewing space. These can be hung from a frame or nearby trees to keep bugs at bay. Look for options like “Skeeta No-See-Um Mosquito Netting” or similar products.
Insect Repellent Sprays: Consider using insect repellent sprays on yourself and your guests. Products like “OFF! Deep Woods Insect Repellent” can be effective against mosquitoes and other insects.
Regular Maintenance: Clean your outdoor viewing area regularly to remove debris and standing water, which can attract bugs.
Screen Cleaning Solutions: Use a screen cleaning solution designed to repel bugs and maintain screen clarity. Products like “Screen Mom Screen Cleaner Kit” can help.
Position Lighting Away from Screen: If you’re using additional lighting around your screen, make sure it’s directed away from the screen to reduce attraction to bugs.
Screen Skirt or Tarp: Consider using a screen skirt or tarp around the lower part of the screen frame to create a physical barrier.
Bug-Repellent Fans: Some fans are designed to disperse bug-repelling substances. Look for options like the “Lasko 7050 Misto Outdoor Misting Fan.”
Remember to follow safety guidelines when using bug-repellent products, especially if you’re applying them to your skin. Additionally, check the compatibility of any cleaning solutions with your specific projector screen material to avoid damage.
How to Fix White Dots on Projector Screen?
Fixing white dots on a projector screen, often referred to as “dead pixels,” can be challenging, as they are typically caused by issues within the projector itself. However, you can try the following steps to address this problem:
Check for Dust and Dirt
Turn off the projector and unplug it.Carefully inspect the screen for any dust or dirt particles that might be causing the white dots. Use a can of compressed air or a soft, lint-free microfiber cloth to gently clean the screen’s surface.
Projector Inspection
Examine the projector’s lens and internal components for any foreign particles or damage. If you see dust or dirt inside the projector, it may require professional cleaning or servicing.
Update or Replace Cables
Sometimes, white dots can appear due to issues with the cables connecting your source device (e.g., computer or DVD player) to the projector. Ensure that all cables are securely connected and in good condition. Consider trying different cables to rule out cable-related problems.
Update Projector Firmware
Check the manufacturer’s website for firmware updates for your projector model. Updating the firmware can sometimes resolve software-related issues that may be causing white dots.
Pixel Stuck or Dead Pixels
White dots could be stuck or dead pixels on the projector’s imaging device (DLP or LCD). These are often hardware issues and may require professional repair or replacement of the imaging device. Contact the manufacturer or a projector repair specialist for guidance.
Contact Manufacturer Support
If your projector is still under warranty or you’re unsure about performing any repairs yourself, it’s advisable to contact the manufacturer’s customer support or a certified service center for assistance.
Professional Repair
If the white dots persist after trying the above steps, especially if they are widespread, it’s best to consult a professional technician who specializes in projector repair. They can diagnose and resolve the issue more effectively.
Remember that attempting to disassemble or repair the projector yourself can void its warranty or potentially cause further damage. If the white dots are persistent and none of the troubleshooting steps work, seeking professional assistance is the safest course of action.
Final Thoughts on Cleaning Projector Screen
In conclusion, keeping your projector screen clean is vital to ensure a crisp and vibrant viewing experience.
Whether it’s removing dust, tackling stubborn stains, or even dealing with mold, the steps outlined here provide a comprehensive guide to maintaining the quality and longevity of your screen.
By following these cleaning methods and using the recommended products, you can enjoy your favorite movies, presentations, and games with clarity and brilliance.
Regular maintenance and care will not only enhance your viewing pleasure but also extend the life of your projector screen.
So, don’t hesitate to invest a little time in cleaning to reap the rewards of a spotless, high-quality screen.
Author of this Post:

Kristy Roger
Home Cinema Consultant & Tech Enthusiast
Holding a background in Industrial and Electrical Technology from the University of Alberta, Kristy has spent 5+ years consulting on home theater products at a top electronics firm. As a certified Technical Professional with Lean Six Sigma credentials, Kristy expertise ranges from projector nuances to hands-on experience with leading models. Kristy have been sharing her knowledge online for two years, blending professional insights with personal experiences from her own home cinema setup. Off the screen, She is a dedicated mom to Jerry, Ryan, and our two pups, Cuddle and Paw.


