
How to Choose Best Projector Screen [Easy 7 Steps]
-
 Written by:
Kristy Roger
Written by:
Kristy Roger
- Last Updated:
Are you scratching your head about which projector screen to buy? I totally get it; the choices can be overwhelming.
You’re in the right spot to clear up all that confusion.
Picking the perfect screen isn’t just about size; it’s about quality, setting, and yes, even your wallet.
Why focus on this? A top-notch screen can make movies feel like you’re at the cinema, turn presentations into deal-closers, and take gaming to the next level.
Whether your setup is for home, work, or play, the screen you pick really matters. Plus, let’s be honest, we all want value for our money, right?
So, stay with me as we explore how to choose the ultimate projector screen for your specific needs. Trust me, you’ll thank yourself later!

I recommend using the Table of Contents to quickly access the information you need.
My article is designed to cater to home cinema users of all levels, from Beginners to Advanced enthusiasts.
Table of Contents
How to Choose Best Projector Screen?
Step 1: Understanding Your Projector’s Resolution
Selecting the right projector screen starts with knowing your projector’s resolution. Let me explain why this is so important.
Firstly, consider resolution as the quality of your image. Investing in a high-resolution projector means you’re looking for a sharp, vibrant display.
However, there’s a twist: even the best projector won’t perform well if you pair it with a subpar screen. It’s like owning a luxury car but using low-grade fuel.
To get the most out of a high-resolution projector, you need a compatible, high-quality screen. This guarantees that the projector captures and displays every hue, detail, and nuance perfectly.
Now, let’s discuss screen size and where to sit. Your projector’s resolution greatly influences these choices. For example, with a 4K projector, you can sit nearer to a bigger screen without seeing any pixelation.
Conversely, a lower-resolution projector may show visible pixels if you’re too close to a large screen. Understanding your projector’s resolution helps you choose the right screen size and optimal seating position. This ensures an immersive, high-quality viewing experience for everyone.
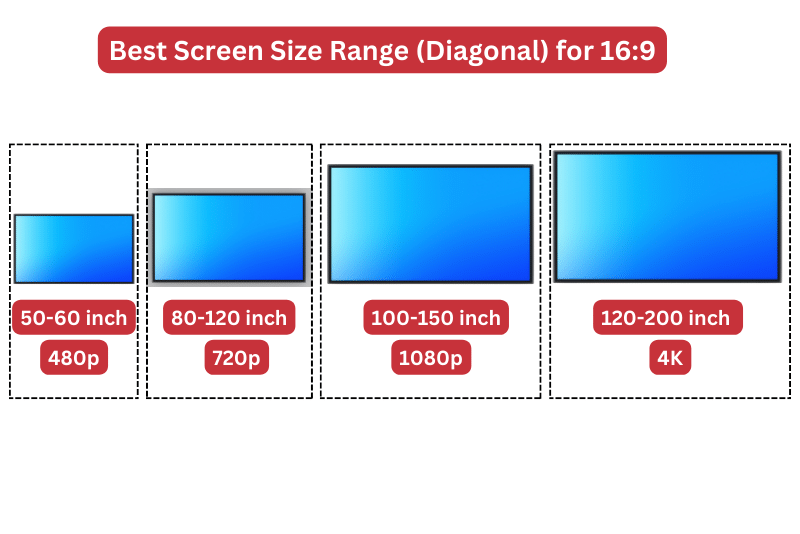
I’ve created a chart to help you pick a projector screen based on resolution.
For the sake of clarity, we’ll use 1080p resolution as our guiding example throughout this guide!
Step 2: Picking the Right Screen Size: A Balance of Resolution and Room Space
When you look at the chart, you’ll notice suggestions like 100-150 inches for a 1080p projector. But how do you decide between 100 inches, 120 inches, or 150 inches?
Let’s dive deeper to find the best fit.
The key lies in understanding the relationship between screen size and viewing distance. It’s not just about the projector’s resolution; it’s also about how much space you have in your room.
Why does this matter? Well, even if you have a top-notch 1080p projector, if your room can’t fit a large screen, you won’t get the best experience. It’s essential to match the screen size with the space you have available.
Based on my years as a senior home cinema consultant, here a simple method I’ve used to determine the ideal viewing distance:
Take the screen size, say 100 inches. Convert that to feet, which gives you 8.3 feet for a 100-inch screen. Now, double that number. That means for a 100-inch screen, the ideal viewing distance is around 16.6 feet. So, if you’re thinking of getting a 100-inch screen for your 1080p projector, your seating should ideally be between 16 to 17 feet from the screen.
If your room is spacious, you can consider a larger screen. But what if your space is limited to less than 16-17 feet? In that case, a smaller screen, like 80 inches, might be better.
Based on my experience, if the viewing distance is shorter than recommended, it can lead to some discomfort. It’s akin to sitting too close to a movie screen in a theater; you might find yourself constantly adjusting or straining your eyes to take in the whole picture.
This can potentially lead to eye fatigue or even headaches, especially during extended viewing sessions.
Step 3: Right Aspect Ratio for your Projector Screen
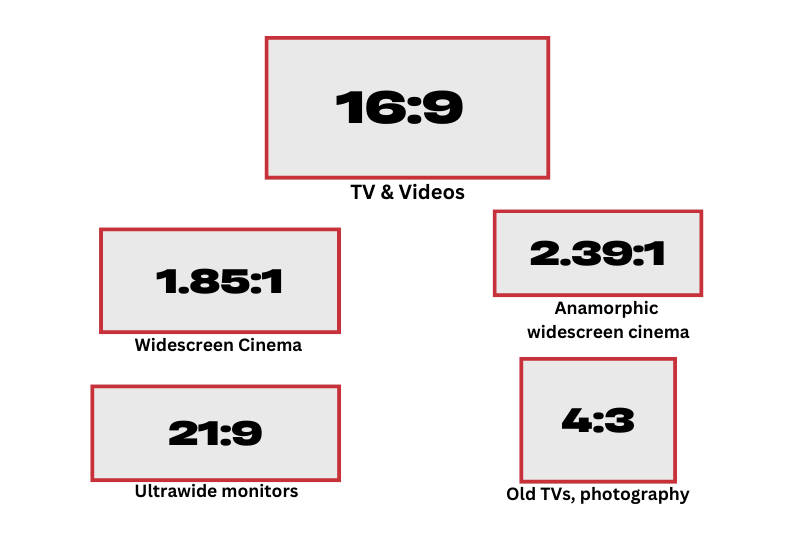
For movie buffs, sports fans, and gamers, the 16:9 aspect ratio is the go-to choice. This is the shape of the screen, and it’s the default setting for most home theater projectors. Why?
Because it perfectly fits the widescreen format that most modern movies, TV shows, and video games use. It fills your vision with action, making you feel like you’re part of what you’re watching.
Now, you might wonder about other aspect ratios like 4:3 or 16:10. These are options, sure, but they’re more common in educational and business settings. Think PowerPoint presentations or classroom lectures. These ratios are designed to fit a different type of content, not usually for entertainment.
But let’s get back to why 16:9 screens are my top pick. They’re everywhere! Walk into any electronics store, and you’ll find a sea of 16:9 options. This makes them not only easy to find but also more affordable due to their popularity.
There’s also something called cinemascope, with ratios like 2.35:1 or 2.40:1. These are the ultra-widescreen formats you might see in a commercial movie theater. Sounds cool, right? Well, it is, but there’s a catch.
These screens are often more expensive and harder to find. Plus, not all movies or content are made to fit this ratio. So, for most home setups, 16:9 remains the champion. It offers a great balance of availability, price, and compatibility with a wide range of content.
Step 4: Picking the Right Type of Screen: A Guide for Use and Installation
The world of projector screens offers a dozen different types, but don’t stress! I’ve simplified things by creating a handy table for you. This table outlines the types of screens, their ideal uses, and installation tips.
Your needs will guide you in selecting the right type of screen. Here’s the table to help you make an informed choice:
| Type of Screen | Best Use | Installation or Setup |
|---|---|---|
Manual Pull-Down | Classrooms, occasional home use | Easy, wall or ceiling mount |
Electric/Motorized | Home theaters, corporate presentations | Moderate, electrical setup required |
Fixed Frame | Dedicated home theaters, professional presentations | Moderate to difficult, wall mount |
Portable | Temporary setups, outdoor movies, travel | Easy, no mounting required |
Tripod | Business presentations, portable setups | Easy, stand setup |
Floor Rising | Spaces where wall or ceiling mounting is not possible | Easy, floor setup |
Inflatable | Outdoor events, large gatherings | Easy to moderate, inflation required |
Rear Projection | Limited front space, trade shows | Moderate, specific placement needed |
Curved | High-end home theaters for immersive experience | Difficult, precise wall mounting required |
Paint-On | DIY setups, spaces with unique wall dimensions | Moderate, painting required |
Acoustically Transparent | Home theaters with speakers behind the screen | Moderate to difficult, wall mount |
High Gain | Bright rooms, large venues | Varies, depends on form factor |
Mounting type without Drilling
Here are the mounting types that generally don’t require drilling:
Mounting Type | Best Use | Additional Notes |
Floor Stand | Portable setups, trade shows | Temporary, easy to set up and take down |
Tripod | Portable presentations, temporary setups | Easy to set up and take down, not ideal for permanent installations |
Truss | Large venues, outdoor events | Temporary or semi-permanent, often used for large or heavy screens |
Suction Cup | Temporary setups, car presentations | Easy to set up, not for heavy screens |
Inflatable Frame | Outdoor movies, events | Temporary, requires inflation |
Freestanding | Multi-use rooms, temporary setups | No installation required, easy to move |
Foldable | Portable setups, travel | Easy to fold and transport, temporary use |
Ground Mount | Outdoor events, backyard movies | Stakes or weights secure it to the ground |
Outside Mount | Outdoor events, large venues | Requires external structure for support |
Tripod Mount | Quick presentations, portable setups | Similar to Tripod, specific to certain models |
These options are generally easy to set up and take down, making them ideal for temporary or portable setups. They also avoid the need for drilling holes, which is great if you’re looking for a non-permanent solution or using a space where drilling is not allowed.
Step 5: Choose the Projector Screen Material
Each type of screen material has its own advantages and disadvantages, affecting factors like image quality, sound penetration, and ambient light rejection.
Make sure to choose the screen material that best suits your specific needs and viewing environment.
Some of these materials, like metal, alloy steel, and wood, are often used for the frame or structure of the screen rather than the screen surface itself.
Others, like polyester and PVC, are commonly used for the screen surface in specific types of screens, such as portable or inflatable models.
Type of Screen | Type of Material |
Manual Pull-Down | Matte White, Glass Beaded, Vinyl, Polyester |
Electric/Motorized | Matte White, High Contrast Gray, Vinyl, Polyester |
Fixed Frame | Matte White, Woven Acoustic Transparent, Aluminum (frame), Wood (frame) |
Portable | Matte White, PVC, Polyester, Nylon, Spandex, Polyethylene Terephthalate |
Tripod | Matte White, Glass Beaded, Metal (frame), Alloy Steel (frame) |
Floor Rising | Matte White, Vinyl, Aluminum (frame) |
Inflatable | PVC, Oxford Cloth, Polyester, Nylon |
Rear Projection | Diffusion Material, Gray, Acrylic |
Curved | High Contrast Gray, Silver, Fiberglass |
Paint-On | Specially Formulated Paint, Acrylonitrile Butadiene Styrene (frame) |
Acoustically Transparent | Woven, Perforated, Polyester |
High Gain | Silver, Glass Beaded, Glass Fiber |
DIY | Wood (frame), Plastic (frame), Iron (frame), Stainless Steel (frame) |
Different materials have their unique properties and advantages. However, certain materials might be more prone to wrinkles over time. Discover how to fix projector screen wrinkles to prolong the life and quality of your screen
Step 6: What is your Budget?
When it comes to your wallet, projector screens offer a wide range of options. Some are cheap, while others might make you think twice before buying. Let’s break down what affects the price.
First, size matters. Bigger screens usually cost more. If you’re setting up a small home theater or just need something for occasional use, a smaller screen will be easier on your budget.
Material also plays a role. High-quality materials like woven acoustic fabric or high-gain materials will bump up the price. On the other hand, basic matte white screens are generally more affordable.
Don’t forget about special features. Some screens come with motorized systems that let you roll them up or down with a remote. Others might have special coatings to improve image quality. These extras can quickly add to the cost.
Lastly, the brand can influence the price. Well-known brands often charge more, but they usually offer better quality and customer service.
So, before you buy, think about what you really need. If you just want something simple for family movie nights, a basic, smaller screen should do the trick without breaking the bank. But if you’re building a high-end home theater, be prepared to invest a bit more for a top-quality screen with all the bells and whistles.
Step 7: Select the Screen Gain
Projector screen gain is how we measure the amount of light reflected from a screen. It’s a crucial factor for getting the best image quality in our movie nights or presentations.
A high gain screen reflects more light, making the image brighter, but it can also narrow the optimal viewing angle.
On the other hand, a low gain screen diffuses light more widely, giving a broader viewing area but may result in a dimmer image.
For instance, if I’m setting up a home theater in a dark room and want a really vibrant image, I might opt for a projector screen with a high gain of 1.5 or even 2.0. This would reflect a lot of light back to the viewers, enhancing the brightness and color saturation.
However, if I’m in a living room with some ambient light, I’d go for a screen with a lower gain, perhaps around 1.0 or 1.1. This lower gain screen scatters the light more evenly, reducing hot-spotting and ensuring a decent image even with some lights on. It’s all about finding the right balance for your specific viewing environment.
Also keep in mind that projector screen gain is typically a fixed characteristic of the screen itself and is not adjustable through the projector. It depends on the screen material’s reflective properties and texture.
In general, a screen with a gain between 1.0 and 1.3 is versatile and works well in various conditions. A gain of 1.0 is perfect for a room with complete light control, while 1.3 can help counter some ambient light.
Following these guidelines, I genuinely believe you can create a home cinema that feels just as good, if not better, than any theater out there. And hey, who wouldn’t want a top-notch movie night right in their living room?
Projector Screen FAQ
How to Clean Projector Screen?
Cleaning a projector screen is crucial to maintain image quality. Here’s how I do it:
Gather Your Supplies: I grab a microfiber cloth, a can of compressed air, and a soft brush to clean projector screen. For tough spots, a screen-cleaning solution may come in handy.
Turn Off the Projector: Safety first. I make sure the projector is off and cool to the touch.
Dust Off: Using the soft brush or a can of compressed air, I gently remove dust and loose debris from the screen’s surface. This helps prevent scratches during cleaning.
Wipe with Microfiber Cloth: I fold the microfiber cloth into a soft pad and wipe the screen in gentle, circular motions. Avoid pressing too hard, as it can damage the screen.
Tackle Stains: For stubborn stains or fingerprints, I lightly dampen a corner of the cloth with a screen-cleaning solution (or a mixture of water and isopropyl alcohol). Then, I gently wipe the stained area.
Dry Completely: After cleaning, I ensure the screen is thoroughly dry before turning the projector back on. Wet spots can distort the image.
As for products, I recommend the “Screen Mom Screen Cleaner Kit”. It includes a solution that’s safe for various screens and a microfiber cloth. It’s efficient and doesn’t leave streaks. For the clothes and brushes, you can find them at most electronics stores or online.
How to Measure Projector Screen Size?
Measuring your projector screen size accurately ensures you get the best viewing experience. Here’s how I do it:
Diagonal Measurement: I start by measuring the diagonal screen size, which is the most common way to express screen size. I use a tape measure or a ruler to measure from one corner of the screen to the opposite corner. Be sure to measure only the visible screen area, excluding any bezels.
Aspect Ratio: It’s essential to know the screen’s aspect ratio, which is the ratio of the screen’s width to its height. Common aspect ratios are 16:9 (widescreen) and 4:3 (standard). This information helps when selecting content and adjusting the projector settings.
Screen Dimensions: If I need to determine the width and height of the screen, I can use the Pythagorean theorem. For a 16:9 screen, I multiply the diagonal measurement by 0.871 to find the width and by 0.490 to find the height. For a 4:3 screen, the width is 0.960 times the diagonal, and the height is 0.720 times the diagonal.
Check for Available Space: While screen size is crucial, I also consider the available space in the room. Ensure there’s enough room for the screen to fit comfortably and provide an immersive viewing experience without being too close or too far from the audience.
Aspect Ratio and Resolution Compatibility: Match the screen’s aspect ratio to your projector’s native aspect ratio for the best image quality. Additionally, consider your projector’s native resolution and make sure it’s compatible with your screen size.
Accurate measurements ensure that you choose the right-sized projector screen for your space, creating an enjoyable and visually pleasing viewing experience.
How to Decorate Around Projector Screen?
Decorating around a projector screen can enhance your home theater or entertainment space. Here are some ideas and product recommendations to consider:
Wall Art and Decor
Wall Decals: Choose themed wall decals or murals that complement your entertainment area’s style. For a movie-themed room, consider film reels or cinema-themed decals.
Floating Shelves: Install floating shelves to display movie collectibles, action figures, or decorative items related to your favorite films.
Acoustic Panels: Decorative acoustic panels not only enhance the room’s aesthetics but also improve sound quality in your home theater.
Furniture and Seating
Media Console: Place a stylish media console or TV stand beneath the screen to hold audiovisual equipment, gaming consoles, or storage for movies and games.
Couch and Seating: Choose comfortable seating options like recliners, cozy couches, or even bean bags for a relaxed viewing experience.
Lighting
LED Light Strips: Install LED light strips behind the screen or around the room to create customizable ambient lighting. Many LED strips come with remote controls for color and intensity adjustments.
Smart Bulbs: Invest in smart bulbs that you can control with your smartphone or voice commands. Adjust the lighting to match the mood of the movie or show.
Curtains and Drapes
Blackout Curtains: Use blackout curtains to eliminate unwanted light and glare during daytime viewing. Choose curtains with decorative patterns or colors that suit your room’s theme.
Motorized Curtains: For a touch of luxury, consider motorized curtains that you can open or close with a remote control or a smartphone app.
Projector Screen Frame:
Screen Surrounds: Some projector screens come with decorative frames or borders. If yours doesn’t, you can purchase a screen frame kit that matches your room’s decor.
Rugs and Carpets
Area Rugs: Place an area rug in the center of the room to define the seating area and add warmth to the space. Choose one that complements your color scheme.
Themed Decor
Movie Posters: Frame and hang classic movie posters or posters from your favorite films on the walls.
Popcorn Machine: Consider adding a popcorn machine for a genuine movie theater experience.
Wire Management
Cable Management Solutions: Use cable organizers, cable raceways, or cable sleeves to keep wires and cables neatly hidden and organized.
By incorporating these elements and products, you can create a visually appealing and immersive entertainment space around your projector screen.
How to Fix White Dots on Projector Screen?
Fixing white dots on a projector screen, often referred to as “dead pixels,” can be challenging, as they are typically caused by issues within the projector itself. However, you can try the following steps to address this problem:
Check for Dust and Dirt
- Turn off the projector and unplug it.
- Carefully inspect the screen for any dust or dirt particles that might be causing the white dots. Use a can of compressed air or a soft, lint-free microfiber cloth to gently clean the screen’s surface.
Projector Inspection
- Examine the projector’s lens and internal components for any foreign particles or damage. If you see dust or dirt inside the projector, it may require professional cleaning or servicing.
Update or Replace Cables
- Sometimes, white dots can appear due to issues with the cables connecting your source device (e.g., computer or DVD player) to the projector. Ensure that all cables are securely connected and in good condition. Consider trying different cables to rule out cable-related problems.
Update Projector Firmware
- Check the manufacturer’s website for firmware updates for your projector model. Updating the firmware can sometimes resolve software-related issues that may be causing white dots.
Pixel Stuck or Dead Pixels
- White dots could be stuck or dead pixels on the projector’s imaging device (DLP or LCD). These are often hardware issues and may require professional repair or replacement of the imaging device. Contact the manufacturer or a projector repair specialist for guidance.
Contact Manufacturer Support
- If your projector is still under warranty or you’re unsure about performing any repairs yourself, it’s advisable to contact the manufacturer’s customer support or a certified service center for assistance.
Professional Repair
- If the white dots persist after trying the above steps, especially if they are widespread, it’s best to consult a professional technician who specializes in projector repair. They can diagnose and resolve the issue more effectively.
Remember that attempting to disassemble or repair the projector yourself can void its warranty or potentially cause further damage. If the white dots are persistent and none of the troubleshooting steps work, seeking professional assistance is the safest course of action.
How to Keep Bugs Off Projector Screen?
Keeping bugs off your projector screen, especially for outdoor setups, is essential for a clear viewing experience. Here are some tips and recommended products:
Use an Outdoor Screen Enclosure: Invest in an outdoor screen enclosure or a screen house. These structures provide a physical barrier, keeping bugs away from your screen and projector. Look for options like the “Quick Set 12875 Escape Shelter” or similar products.
Screen Tents or Pop-Up Canopies: Screen tents or pop-up canopies with mesh walls can create a bug-free viewing area. They come in various sizes and are portable. Consider options like the “Coleman Screened Canopy Tent” or similar models.
Bug Repellent Lighting: Use bug-repellent lighting around the screen area. LED bug zapper lights like the “Flowtron BK-40D Electronic Insect Killer” can help keep bugs away.
Citronella Candles or Torches: Citronella candles or torches can create a bug-repelling barrier. Place them strategically around your viewing area.
Mosquito Nets or Curtains: Install mosquito nets or curtains around your viewing space. These can be hung from a frame or nearby trees to keep bugs at bay. Look for options like “Skeeta No-See-Um Mosquito Netting” or similar products.
Insect Repellent Sprays: Consider using insect repellent sprays on yourself and your guests. Products like “OFF! Deep Woods Insect Repellent” can be effective against mosquitoes and other insects.
Regular Maintenance: Clean your outdoor viewing area regularly to remove debris and standing water, which can attract bugs.
Screen Cleaning Solutions: Use a screen cleaning solution designed to repel bugs and maintain screen clarity. Products like “Screen Mom Screen Cleaner Kit” can help.
Position Lighting Away from Screen: If you’re using additional lighting around your screen, make sure it’s directed away from the screen to reduce attraction to bugs.
Screen Skirt or Tarp: Consider using a screen skirt or tarp around the lower part of the screen frame to create a physical barrier.
Bug-Repellent Fans: Some fans are designed to disperse bug-repelling substances. Look for options like the “Lasko 7050 Misto Outdoor Misting Fan.”
Remember to follow safety guidelines when using bug-repellent products, especially if you’re applying them to your skin. Additionally, check the compatibility of any cleaning solutions with your specific projector screen material to avoid damage.
How to Write on a Projector Screen?
Writing on a projector screen can be a fun and interactive way to make presentations or engage with your audience. Here are some methods to write on a projector screen:
Dry Erase Markers
If your projector screen has a whiteboard surface, you can use dry-erase markers to write and draw. These markers are easy to wipe off with a dry eraser or a cloth.
Interactive Projectors
Some projectors are designed to work with interactive pens or styluses. They allow you to write and interact directly on the screen’s surface. Check if your projector supports this feature.
Screen Overlays
Screen overlays are transparent sheets that adhere to your projector screen. You can write on these sheets with dry-erase markers, and they are easy to remove and replace.
Digital Tablets and Styluses
Connect a digital tablet to your computer or projector system. Use a stylus or digital pen to write and draw on your tablet, and the content will be projected onto the screen in real time.
Software Applications
Use screen annotation software or presentation tools that allow you to draw and write on your projected content using your computer’s mouse or a digital pen/tablet.
Mobile Apps
There are mobile apps available for smartphones and tablets that can turn your device into a remote control with drawing capabilities. These apps connect to your projector via Wi-Fi or Bluetooth.
Interactive Whiteboard Systems
Consider investing in an interactive whiteboard system, such as a SMART Board. These systems provide a touch-sensitive surface where you can write, draw, and interact with your projected content.
Document Cameras
Document cameras can project physical documents, objects, or even handwritten notes onto the screen. You can write on paper or use transparencies with a document camera.
Pen Display Tablets
Pen display tablets like Wacom Cintiq can be connected to a computer and used for writing and drawing directly on your projected content.
Screen Recording
If you want to save your written content or presentations, consider using screen recording software. This captures your screen activity, including any annotations you make.
Remember to clean the projector screen after your presentation or writing session, especially if you’ve used markers or other writing tools. Use the appropriate cleaning solution for your screen type to maintain its quality.
Final Thoughts on Projector Screen
In conclusion, choosing the best projector screen involves considering several factors, including screen type, size, gain, and aspect ratio.
It’s essential to match the screen to your specific needs and viewing environment, whether it’s for home theater, presentations, or outdoor entertainment.
By carefully assessing these factors and understanding your requirements, you can elevate your viewing experience and make the most out of your projector setup.
So, take your time, do your research, and select the perfect screen that brings your visuals to life.
Author of this Post:

Kristy Roger
Home Cinema Consultant & Tech Enthusiast
Holding a background in Industrial and Electrical Technology from the University of Alberta, Kristy has spent 5+ years consulting on home theater products at a top electronics firm. As a certified Technical Professional with Lean Six Sigma credentials, Kristy expertise ranges from projector nuances to hands-on experience with leading models. Kristy have been sharing her knowledge online for two years, blending professional insights with personal experiences from her own home cinema setup. Off the screen, She is a dedicated mom to Jerry, Ryan, and our two pups, Cuddle and Paw.


